Before proceeding to create a WhatsApp Business API Sender ID, ensure you have familiarized yourself with and completed the necessary prerequisite for WhatsApp Business API. For more information, please our overview and guide for Syniverse WhatsApp Business API channel.
For a great majority of customers, Syniverse will provide direct assistance with the creation of a WhatsApp business API Sender ID as part of your onboarding solution. If you are an ISV (Independent software vendor) or a Direct Enterprise who wishes to self provision your Sender ID, you need to follow the flow guide outlined below.
One key criteria to self provisioning of a Sender ID for WhatsApp business API is that you have direct access to the active phone/device for the phone number you are looking to provision for your Sender ID
Creating a Syniverse WhatsApp Business API sender ID
Make sure you have the following items handy before invoking the API or console to create a Sender ID
- Facebook Business Manager ID - Same as what you previously submitted to Syniverse
- A WhatsApp Business Account (WABA) - The WABA that you are creating a Sender ID for. Your Syniverse rep can provide you this information if you dont already have it
- Phone number & Display name - This is the Phone number and Display name that was registered for you with your WABA.
- Token - This is the certificate that was generated for your phone number. This would have been given to you by your Syniverse rep. Please make sure it's for the phone number you are looking to use for the service.
Create a WA sender ID using the CPaaS message console
- Log in to https://developer.syniverse.com
- Click on “Voice and Messaging Console”
- Once in the Voice and Messaging Console, navigate to” Messaging Accounts” on the left nav select it to reveal the menu below
- Click on “Sender Address” menu and click on “Purchase or Migrate Sender Address”

- In the “Purchase or Migrate Sender Address window, select the “WhatsApp” Sender Address button and click “Next”
- Now complete the following:
- Sender Address Name: A name for your WhatsApp Sender address in the following format: <WhatsApp Display name_Business ID>e.g. <AcmeDentist_1122408552356>
where ACME Dentist =WhatsApp Display Name and 1122408552356 = Business Manager ID
- Address: This is the phone number you want to use to register your WhatsApp Account. Please note that this number needs to include the country code e.g. 14085551212
- Token: This is the certificate that WhatsApp generated when the Phone number was registered. Copy and paste in the field provided
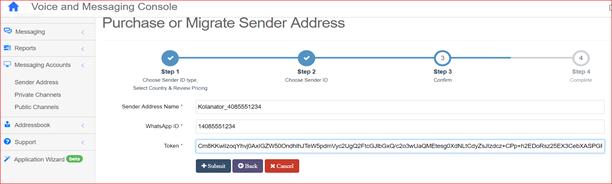
- Once you input all the required info, click submit. The status will be “Pending Implementation” until Syniverse completes implementation of your account. This can take up to 72 hrs to complete after which the status will change to “IMPLEMENTED”
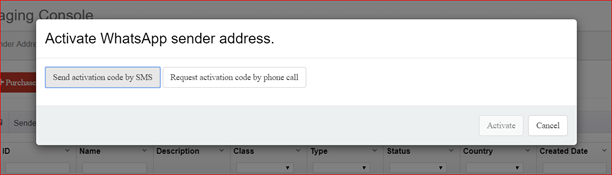
- Once you have a status of "IMPLEMENTED", next step is to authenticate your Phone number by clicking the activate button shown below. Make sure you have the device (desk phone, mobile phone) assigned to the phone number handy.

- Click the applicable activation method for your WhatsApp sender address. You will be prompted for the option you want to use to complete authentication and activate of your phone number.
- Choose activation by SMS if you want to use this method and if your phone number is capable of receiving SMS, or choose Voice if that is the option you prefer. Please note that if you are using a landline phone, you may not be able to receive SMS on it.
- Input the code you receive into the window provided and click activate to confirm the code.
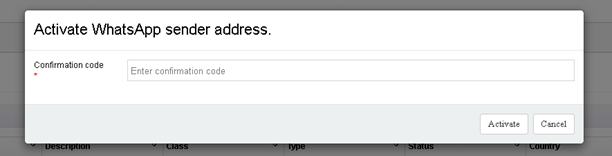
- Your WhatsApp Business API Sender ID should now be active and ready to use.
Create a WA sender ID using the CPaaS API
Using the same credentials and information gathered above. Before proceeding, make sure you are familiar with our API specs which can be found in our API reference guide
- Create Sender ID
- Set name using the format outlined above
- set capabilities = WHATSAPP
- address = the phone number that was registered for you by Syniverse for your WABA
- credentials {token} = this is the certificate generated by WhatsApp for the specific phone number you want to use to create a Sender ID.
curl -X POST \ https://api.syniverse.com/scg-external-api/api/v1/messaging/sender_ids  \
-H 'Authorization: Bearer {TOKEN}' \
-H 'Content-Type: application/json' \
-d '{"name":"Kolanator_1123459579320","capabilities":["WHATSAPP"],"class_id":"COMMERCIAL","type_id":"WHATSAPP","address":"+14086883000", "ownership":"PRIVATE", "credentials":"{\"token\": \"CmsKJwjp5LP39pezAxIGZW50OndhIg5TeW5pdmVyc2UgQkVUQVDUlcDkBRpAMFJ7yqBhCF1Ausx5TFkFgc7QLqGS/ZkjGtnqjyWAxlt/yFHLGc9nwdKLYWaYLNNOxuiCvn+NMArMvMQtUHgXCBIrbWZ/i/je0h7gQ4+2mKRrIZ1Z5eRU7RSIhiiE3eD/urKAitRPMxoz+2A2Cg==\"}"}'
Response: {H4kWf18Wz985Xya2tMyFs}
- Initiate registration with WhatsApp (Voice/SMS).
- state = PENDING_CONFIRMATION ( state from your previous request)
- register_method = this is the method you wish to use to authenticate and activate your Sender ID. You can only use "voice" or "sms"
- version_number = this is an ascending version number of the resource. 1 upon creation, incremented by one for each modification done. Used to implement optimistic locking
curl -X POST \ https://api.syniverse.com/scg-externalapi/api/v1/messaging/sender_ids/H4kWf18Wz985Xya2tMyFs\
-H 'Authorization: {TOKEN}' \
-H 'Content-Type: application/json' \
-d '{"state":"PENDING_CONFIRMATION", "register_method":"voice", "version_number":"2"}'
- Activate WhatsApp Sender ID by confirming code
- Make sure to set the "State" parameter to "ACTIVE"
- Set version number to the next value after the initial registration. This value is usually 3.
curl -X POST 'https://api.syniverse.com/scg-external-api/api/v1/messaging/sender_ids/H4kWf18Wz985Xya2tMyFs'
-H "Authorization: Bearer {TOKEN}"
-H 'Content-Type: application/json'
-d '{"state":"ACTIVE", "verification_code":"702235", "version_number":"3"}'
Now that you have a Sender ID from which you can send and receive messages, the next step is to provision WhatsApp Business API templates that are required to send notification messages. See how to get started on provisioning WhatsApp templates
0 Comments